

Table of Contents
Why These Summer Lunch Ideas Will Save Your Sanity (and Your Budget!)
As a mom of three growing kids with varying appetites and preferences, I know the summer lunch struggle all too well. When school’s out and the chorus of “I’m hungry!” seems to start at 10 AM, having a repertoire of easy, affordable lunch ideas isn’t just helpful—it’s essential for maintaining my sanity!
After years of farming our little homestead and preparing countless meals from our garden bounty, I’ve discovered that summer lunches don’t need to be complicated or expensive to be nutritious and appealing to little ones. The key is using seasonal ingredients, getting creative with presentation, and involving the kids in the process.
These lunch ideas have been kid-tested (and mother approved!) on my own children, who range from my veggie-loving eldest to my decidedly picky middle child. Each recipe uses affordable, accessible ingredients and can be prepared in under 15 minutes—perfect for those busy summer days when you’re juggling work, play, and everything in between.
What You’ll Find in This Guide
- 5 No-Cook Lunch Ideas: Perfect for scorching summer days
- Budget-Friendly Ingredients: Making the most of seasonal produce
- Meal Prep Tips: Prepare components ahead for grab-and-go convenience
- Kid-Approved Flavor Combinations: Tested by my own three hungry munchkins
- Packing Tips: For lunches on the go (perfect for summer outings!)
1. Rainbow Veggie Wraps with Herbed Cream Cheese
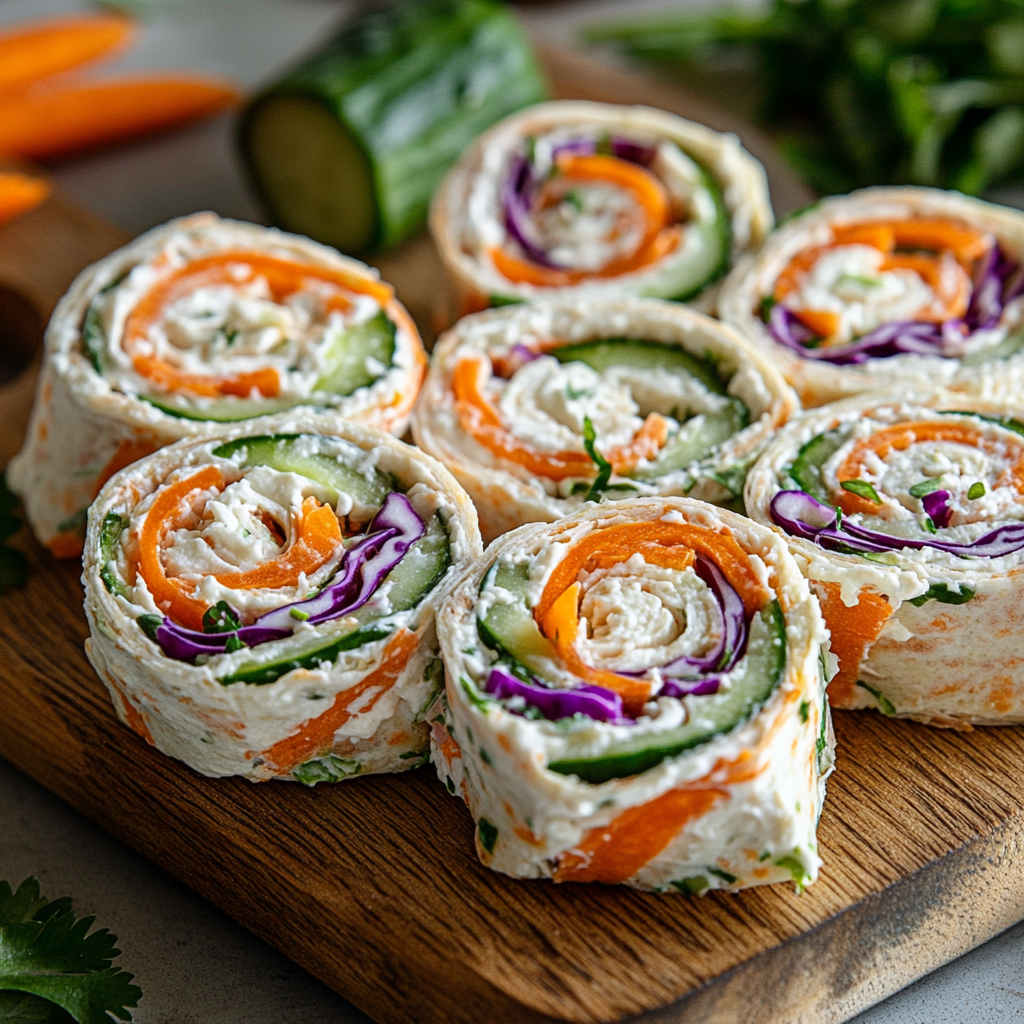
Prep time: 10 minutes | Cost per serving: Approximately $1.25
Ingredients:
- Whole wheat tortillas ($0.25 each when bought in bulk)
- 4 oz cream cheese, softened ($0.89)
- 1 tablespoon fresh herbs from the garden (free if you grow your own; about $0.50 if store-bought)
- Colorful vegetables: grated carrots, cucumber slices, bell pepper strips, baby spinach (about $2 total, less if garden-grown)
- Optional protein: leftover rotisserie chicken or drained canned beans ($1-2)
Instructions:
- Mix cream cheese with finely chopped herbs (we love basil and chives from our garden).
- Spread cream cheese mixture on tortillas.
- Layer vegetables in rainbow order.
- Add protein if desired.
- Roll tightly and slice into pinwheels.
Why Kids Love This:
My children adore these wraps because they can help choose the vegetables and create their own colorful combinations. The pinwheel presentation makes them fun to eat, and the herbed cream cheese adds flavor without introducing unfamiliar spices that might trigger picky eater resistance.
Money-Saving Tip:
Use whatever vegetables are in season or on sale. In summer, cucumber, bell peppers, and tomatoes are usually at their cheapest (or free from your garden!). Buying a whole rotisserie chicken for dinner and using the leftovers in these wraps the next day stretches your budget even further.
2. Build-Your-Own Snack Plate Lunch
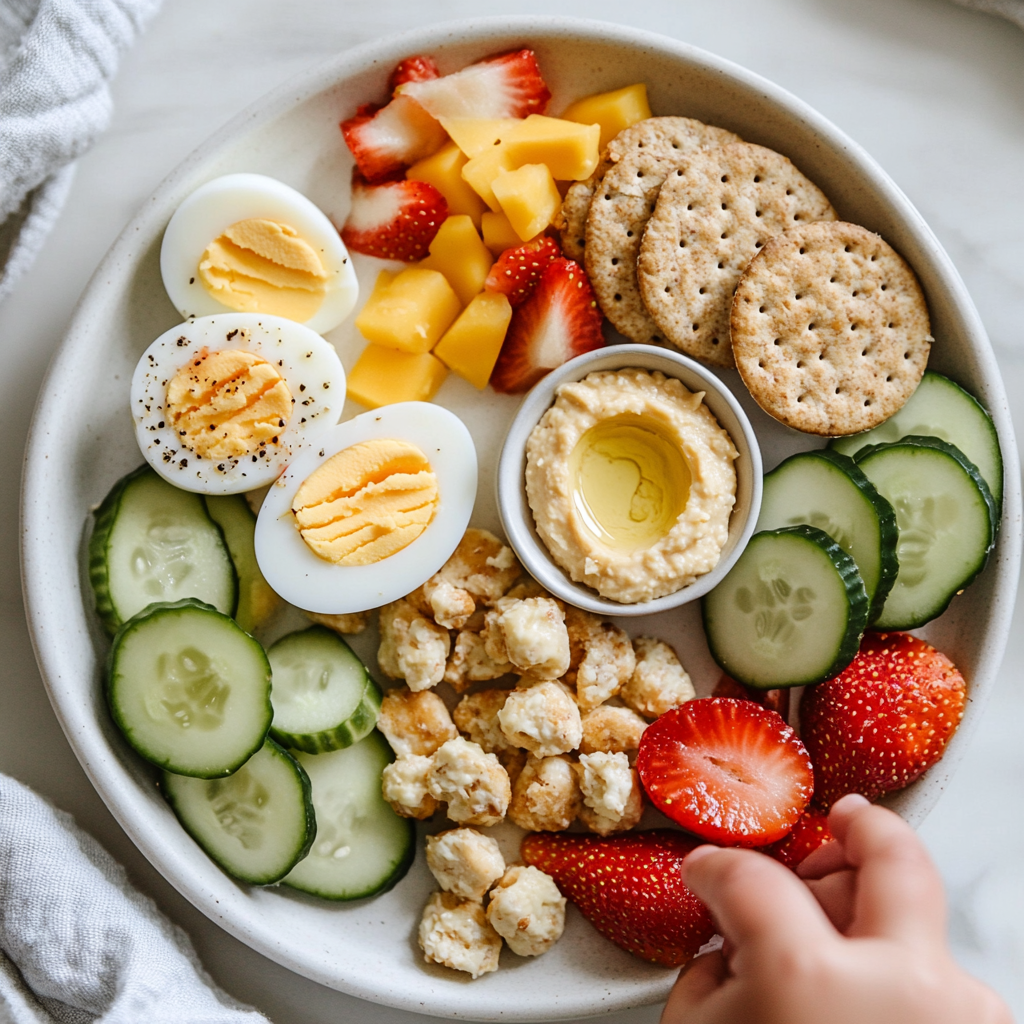
Prep time: 5 minutes | Cost per serving: Approximately $1.75
Ingredients (mix and match based on what you have):
- Hard-boiled eggs ($0.25 each)
- Cheese cubes ($0.75 for a few cubes)
- Whole grain crackers ($0.50 for a serving)
- Fresh seasonal fruit slices (about $0.75)
- Vegetable sticks ($0.50)
- Hummus or ranch dip ($0.50 for a small portion)
Instructions:
- Hard-boil eggs ahead of time (I do a batch on Sunday for the week).
- Arrange small portions of each component on a plate with separate sections.
- Let kids choose what combinations they want to eat.
Why Kids Love This:
This “choose your own adventure” style lunch gives children autonomy, which increases the likelihood they’ll actually eat what’s in front of them. My middle child, who typically resists new foods, will try more items when presented this way rather than as a traditional meal.
Money-Saving Tip:
Watch for sales on block cheese (much cheaper than pre-cubed) and seasonal fruits. I keep a container of hard-boiled eggs in the fridge at all times during summer—an incredibly economical protein source at roughly 25 cents per egg.
3. Peanut Butter Banana Sushi Rolls

Prep time: 5 minutes | Cost per serving: Approximately $0.75
Ingredients:
- 2 slices whole wheat bread, crusts removed ($0.30)
- 2 tablespoons peanut butter (or sunbutter for allergy-friendly option) ($0.25)
- 1 ripe banana ($0.25)
- Optional toppings: drizzle of honey, sprinkle of cinnamon, mini chocolate chips ($0.20)
Instructions:
- Flatten bread slices with a rolling pin.
- Spread with peanut butter.
- Place banana at one end and roll up tightly.
- Slice into “sushi” pieces.
- Add optional toppings if desired.
Why Kids Love This:
The fun sushi presentation transforms ordinary sandwich ingredients into something exciting. My kids giggle every time I serve these and love helping to roll and slice them.
Money-Saving Tip:
Watch for marked-down ripe bananas—they’re perfect for this recipe and often cost half the price. I freeze overripe bananas for smoothies, but the slightly soft ones work wonderfully here.
4. Cold Pasta Salad with Garden Veggies
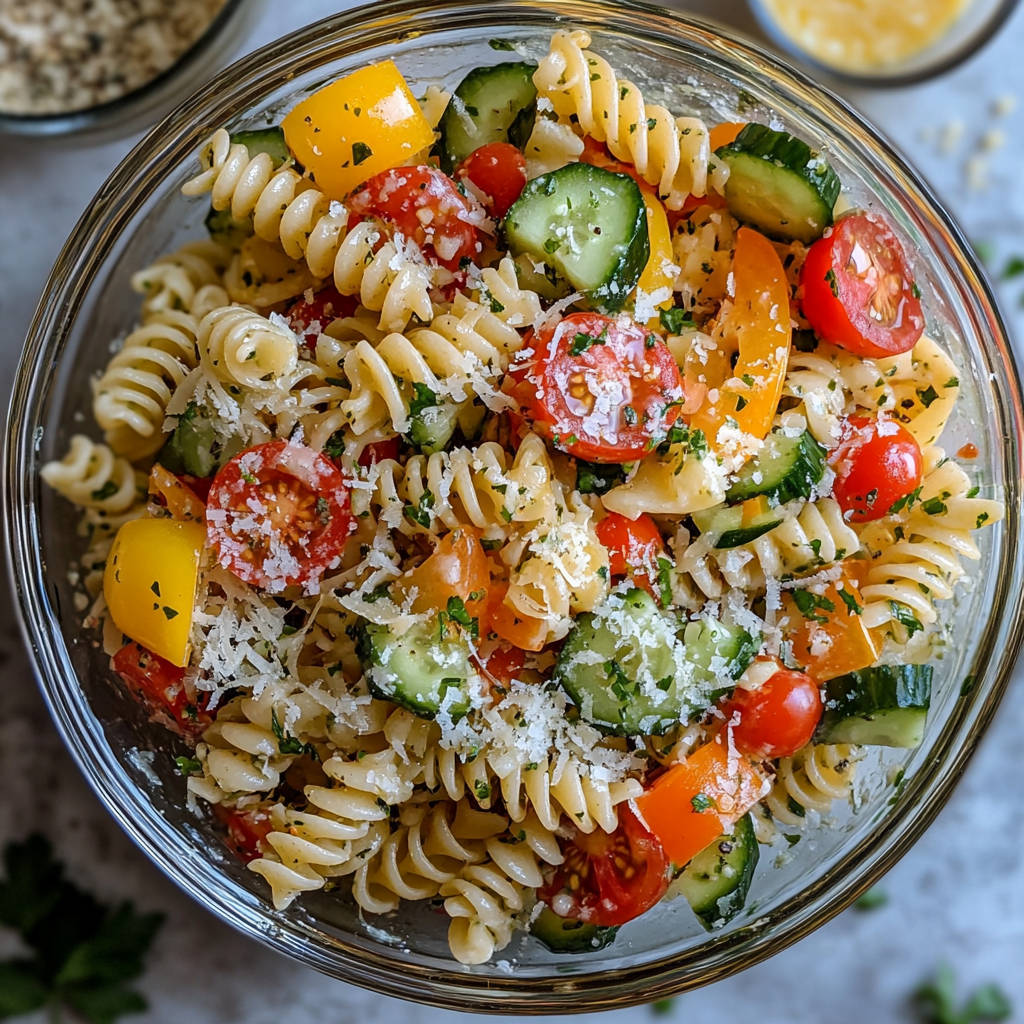
Prep time: 15 minutes | Cost per serving: Approximately $1.00
Ingredients:
- 2 cups cooked and cooled pasta ($0.50)
- 1 cup diced seasonal vegetables (cherry tomatoes, cucumber, bell pepper) ($1.00)
- ¼ cup mild Italian dressing ($0.30)
- ¼ cup shredded cheese ($0.50)
- Optional protein: diced ham, turkey, or chickpeas ($1.00)
Instructions:
- Cook pasta ahead of time and store in refrigerator.
- Combine cold pasta with chopped vegetables.
- Add protein if desired.
- Toss with dressing just before serving.
- Sprinkle with cheese.
Why Kids Love This:
The mild Italian dressing provides familiar flavor without being overpowering, and the pasta makes it approachable. My kids love helping choose which vegetables to include, which increases their investment in actually eating it.
Money-Saving Tip:
Cook a double batch of pasta for dinner and set aside half for this lunch. Use homemade dressing (olive oil, vinegar, and Italian seasoning) to save even more.
5. Yogurt Parfaits with Seasonal Fruit
Prep time: 5 minutes | Cost per serving: Approximately $1.25
Ingredients:
- 1 cup plain yogurt ($0.75)
- 1 tablespoon honey or maple syrup ($0.25)
- ½ cup seasonal berries or diced fruit ($1.00)
- ¼ cup granola ($0.50)
Instructions:
- Layer yogurt, fruit, and granola in a jar or cup.
- Drizzle with honey or maple syrup.
- Serve immediately or refrigerate until ready to eat.
Why Kids Love This:
The layered presentation makes this simple meal feel special, and kids love helping create the colorful layers. The natural sweetness from fruit and touch of honey makes the yogurt appealing even to children who might resist plain yogurt.
Money-Saving Tip:
Buy plain yogurt in large containers rather than individual cups—it’s much more economical. Make your own granola when oats are on sale (a batch costs about $2 and lasts for weeks). Use whatever fruit is in season or on sale—in summer, berries and stone fruits are often priced well.
Make-Ahead Tips for Busy Summer Days
As a work-from-home mom juggling my blog, our small farm, and three active kids, I’ve learned that a little preparation goes a long way. Here’s how I stay ahead of the summer lunch rush:
- Weekend Prep Session: Dedicate 30 minutes on Sunday to:
- Hard-boil a dozen eggs
- Chop vegetables for the week
- Cook extra pasta or grains
- Portion out dips and dressings
- Freezer-Ready Components: Prepare and freeze:
- Cooked pasta portions (slightly undercook, then rinse with cold water before freezing)
- Extra tortillas (place parchment paper between each)
- Sliced bread for quick defrosting
- Designated Lunch Station: Create a low shelf in your refrigerator with:
- Pre-portioned fruits and vegetables
- Cheese sticks or cubes
- Yogurt cups
- Hard-boiled eggs
This system allows older children to help themselves to healthy options and gives you grab-and-go components for assembling quick lunches.
How to Pack These Lunches for Summer Outings
When we’re heading to the pool, park, or on a day trip, I pack these lunches using:
- Insulated lunch bags with ice packs (invest in good quality ones—they’ll last for years)
- Reusable containers with dividers (much cheaper than buying bento boxes)
- Mason jars for parfaits and salads (we already have these for canning, so dual-purpose!)
- Reusable silicone bags for sandwiches and wraps (an investment that pays for itself after about 20 uses)
Final Thoughts: Making Summer Lunches Stress-Free
The key to successful summer lunches is having a flexible framework rather than rigid recipes. Once you master these five basic ideas, you can adapt them endlessly based on what’s fresh, affordable, and appealing to your children.
Remember that investing children in meal preparation—even if it’s just letting them arrange items on their plate—dramatically increases the likelihood they’ll actually eat what you serve. This summer, try treating lunch as an opportunity for creativity and connection rather than just another meal to check off your list.
What summer lunch ideas work in your household? I’d love to hear your budget-friendly suggestions in the comments below!
FAQ About Kid-Friendly Summer Lunches
Q: My child is extremely picky. Which of these lunches would you recommend starting with?
A: The Build-Your-Own Snack Plate is often my go-to for picky eaters. The small portions and choice element reduces mealtime pressure, and children often surprise themselves by trying new foods when they’re in control of their selections.
Q: How do you keep lunch costs down when feeding multiple children?
A: Focus on seasonal produce, buy in bulk when possible, and embrace simple proteins like eggs, beans, and occasional deli meats rather than expensive packaged lunch products. Our family of five keeps summer lunch costs around $2 per person per day using these strategies.
Q: Can these lunches be prepared the night before?
A: Absolutely! The pasta salad actually tastes better after marinating overnight. For wraps, prepare the filling components separately and assemble in the morning to prevent sogginess. Parfaits can be made ahead without the granola (add that just before serving).
Q: We’re always on the go during summer. Which of these travel best?
A: The wraps and pasta salad are my go-to options for pool days and park outings. They hold up well in a cooler and can be eaten without utensils if necessary.
Q: How do you incorporate garden produce into these lunches?
A: We use garden herbs in the cream cheese spread, fresh vegetables in the wraps and pasta salad, and berries in the yogurt parfaits. Even a small container garden can supplement your summer lunches with fresh herbs and cherry tomatoes!
Q: What’s your strategy for getting kids to actually eat vegetables?
A: Presentation matters tremendously. Cutting vegetables into fun shapes, serving them with dips, and involving kids in growing or selecting produce all increase the chances they’ll eat them. And never underestimate the power of a good name – “dinosaur trees” are much more appealing than “broccoli” to many young children!
If you enjoyed this post, you might also like:
- 10 Vegetables Any Child Can Grow (And Actually Eat!)
- Budget-Friendly Batch Cooking: One Afternoon, Five Easy Dinners
- Our Family’s Favorite Homemade Popsicles: Healthier Than Store-Bought!
Don’t forget to pin this post for later and share it with other parents looking for summer lunch inspiration!